经过几天的奋战,终于将Hibernate4+Spring4+Struts2整合成功了。一路走来艰辛艰辛啊,尤其是jar包,我是一个一个的试的,差点把我整死了。本解决方法针对xml配置,非注解,注解的话需要加入注解包,下面我提供包的可能已经包括注解包了,提供的方法中也有注解的配置。
本实例,Hibernate为模型层,Spring为控制层,Struts2为表现层
写在开始:
本方法的目录结构如下:
[caption id="attachment_363" align="alignnone" width="335"]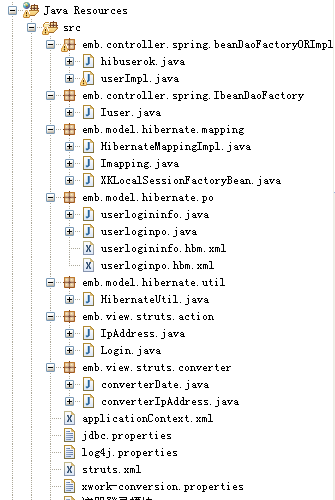 目录结构[/caption]
1,先说说版本:
hibernate-core-4.3.9.Final.jar
spring-core-4.1.6.RELEASE.jar
struts2-core-2.3.24.jar
均为当前最新版本
2,整合方法,为了节约您的时间,我将ssh所需要的jar包已经打包,并上传到百度云盘,下面提供下载下载。
3,配置文件:
a,hibernate的映射配置文件我在这里就不说了
b,先看applicationContext.xml
这个配置文件,定义了Spring与Hibernate整合的一些配置,以及后期的action的一些配置也在里面
下面贴上全部代码以及注释:
<?xml version="1.0" encoding="UTF-8"?>
<beans
	xmlns="http://www.springframework.org/schema/beans"
	xmlns:xsi="http://www.w3.org/2001/XMLSchema-instance"
	xmlns:aop="http://www.springframework.org/schema/aop"
	xmlns:p="http://www.springframework.org/schema/p"
	xsi:schemaLocation="http://www.springframework.org/schema/beans
	http://www.springframework.org/schema/beans/spring-beans-4.1.xsd
	http://www.springframework.org/schema/aop
    http://www.springframework.org/schema/aop/spring-aop-4.1.xsd"
>

	<!-- 加载数据库连接配置信息,配置信息都下在了文件jdbc.properties里面-->
    <bean id="DBconfig" class="org.springframework.beans.factory.config.PropertyPlaceholderConfigurer">
	    <property name="locations">
	      <value>classpath:jdbc.properties</value>
	    </property>
  	</bean>
	<!-- calss是DataSource实现类 -->
	<bean id="dataSource" class="org.springframework.jdbc.datasource.DriverManagerDataSource">
		<property name="username" value="${jdbc.username}" />
		<property name="password" value="${jdbc.password}" />
    	<property name="url" value="${jdbc.url}" />
    	<property name="driverClassName" value="${jdbc.driver}" />
  	</bean>

	<!-- 这里开始就实现了与Hibernate的整合 -->
        <bean id="sessionFactory" class="org.springframework.orm.hibernate4.LocalSessionFactoryBean">
		<property name="dataSource">
			<!-- 连接数据源(注入dataSource) -->
			<ref bean="dataSource"/>
		</property>

		<property name="hibernateProperties">
			<props>
				<!-- 配置数据库方言 -->
				<prop key="hibernate.dialect">org.hibernate.dialect.OracleDialect</prop>
				<!-- sql语句显示 -->
				<prop key="hibernate.show_sql">true</prop>
			</props>
		</property>

		<!-- 配置ORM(XML文件)映射文件 -->
		<property name="mappingResources">
			<list>
				<value>emb/model/hibernate/po/userloginpo.hbm.xml</value>
			</list>
		</property>


		<!-- 配置注解的实体类
		<property name="annotatedClasses">
			<value>his.hib.po.userloginpo</value>
		</property>
		-->
	</bean>
	<bean id="hibernateUtil"
        class="emb.model.hibernate.util.HibernateUtil">
      <property name="sessionFactory" ref="sessionFactory" />
  	</bean>

	<bean id="userimpl" class="emb.controller.spring.beanDaoFactoryORImpl.userImpl" />
	<!-- 此处为配置action 第一个name是名字,第二个name是该action中的属性(接口)以及属性对应的实现类 -->
	<bean name="okuserpass" class="emb.view.struts.action.Login">
    	<property name="iuser">
    		<ref bean="userimpl" />
    	</property>
    </bean>
</beans>
后面三个bean,第一个是注入sessionfactory,第二个是创建userimpl实体类的bean,第三个bean配置的是action
此文件的配置信息 大家可以参考我之前写的一篇文章
https://www.bugkong.com/archives/2015_06_350.html
c,struts.xml里面主要注意两处,第一,加入<constant name="struts.objectFactory" value="spring" />
第二,在配置action时的struts.xml,其class不使用类的全路劲,而使用我们在applicationContext.xml里面配置的bean,以下为全部的代码
<?xml version="1.0" encoding="UTF-8"?>
<!DOCTYPE struts PUBLIC
		"-//Apache Software Foundation//DTD Struts Configuration 2.0//EN"
		"http://struts.apache.org/dtds/struts-2.0.dtd">

<struts>
<constant name="struts.objectFactory" value="spring" />
	<!-- 中文乱码,设置编码格式为gbk -->
	<constant name="struts.i18n.encoding" value="gbk" />
	<package name="struts2" extends="struts-default">
		<!-- 定义全局结果 -->
		<global-results>
			<result name="login" type="redirect">login.jsp</result>
		</global-results>

		<!-- 此处class为spring中配置的beanid -->
		<action name="login" class="okuserpass">
			<result>login_success.jsp</result>
			<result name="input">login_error.jsp</result>
		</action>
	</package>
</struts>
d,web.xml配置:
<?xml version="1.0" encoding="UTF-8" ?>
<!DOCTYPE html PUBLIC "-//W3C//DTD XHTML 1.0 Strict//EN" "http://www.w3.org/2002/xmlspec/dtd/2.10/xmlspec.dtd">
<web-app version="2.5"
	xmlns="http://java.sun.com/xml/ns/javaee"
	xmlns:xsi="http://www.w3.org/2001/XMLScbema-instance"
	xsi:xchemaLocation="http://java.sun.com/xml/ns/javaee http://java.sun.com/xml/ns/javaee/web-app_2_5.xsd">


	<listener>
		<listener-class>org.springframework.web.context.ContextLoaderListener</listener-class>
	</listener>

	<!-- 配置Struts2过滤器 -->
	<filter>
		<filter-name>struts2</filter-name>
		<filter-class>org.apache.struts2.dispatcher.ng.filter.StrutsPrepareAndExecuteFilter</filter-class>
	</filter>
	<filter-mapping>
		<filter-name>struts2</filter-name>
		<url-pattern>/*</url-pattern>
	</filter-mapping>

	<!-- 配置Spring信息 -->
	<context-param>
		<param-name> contextConfigLocation</param-name>
		<param-value>/WEB-INF/classes/applicationContext.xml</param-value>
	</context-param>


	<welcome-file-list>
		<welcome-file>Login.jsp</welcome-file>
	</welcome-file-list>

</web-app>
4,类的配置
a,模型层:实体类以及 映射文件我们就不说了,主要说说hibernate的工具类应该怎么写,我们把以前写的删掉,重新写。
大家看上面applicationContext.xml里面有段代码是这么写的
	<bean id="hibernateUtil"
        class="emb.model.hibernate.util.HibernateUtil">
      <property name="sessionFactory" ref="sessionFactory" />
  	</bean>
因此我们看看hibernate工具类怎么写的
public class HibernateUtil {

	private static HibernateTemplate hibernateTemplate;

    public void setSessionFactory(SessionFactory sessionFactory) {
		hibernateTemplate = new HibernateTemplate(sessionFactory);
	}
    public HibernateTemplate getSessionFactory() {
    	System.out.println("我在HibernateUtil");
		return hibernateTemplate;
	}
}
以上代码我们定义了sessionFactory的一个set方法,这个方法需要一个SessionFactory的一个参数,而这个参数正是由上面的配置文件中注入进来的。注入的sessionFactory是由配置文件定义好了的。
好了,在hibernate就只需要一个工具类就行了,至于目录中提到的其他包,大家不用管,那我是额外写的其他东西
b,控制层:现在我们看看Spring的emb.controller.spring.beanDaoFactoryORImpl这个包,这个包我主要放接口的实现类,或其他类
而emb.controller.spring.IbeanDaoFactory这个包主要放接口
接口类Iuser,只有一个类:
public interface Iuser {
	public boolean userlogin(String username,String userpass);		//判断用户密码
}
实现类userImpl,继承了接口。实现了判断用户名和密码是否正确的方法,本实例不讨论其他的哈:
静态块用于初始化。方法中的查询用了hibernateTemplate的find方法。这里和hibernate有点区别。大家注意。
userloginpo这个是hibernate的po层的映射类
public class userImpl implements Iuser{
	private static HibernateTemplate hibernateTemplate;

	static
	{
		@SuppressWarnings("resource")
		ClassPathXmlApplicationContext context = new ClassPathXmlApplicationContext("applicationContext.xml");
		HibernateUtil hibernateutil = (HibernateUtil) context.getBean("hibernateUtil");
		hibernateTemplate = hibernateutil.getSessionFactory();
	}

	@Override
	public boolean userlogin(String username, String userpass) {
		Iterator it = null;
		List list = null;
		userloginpo ulp = null;
		String hql = "from userloginpo U where U.username=? and userpass=?";
		Object[] values = {username,userpass};
		list = hibernateTemplate.find(hql, values);
		if((null == list) || (list.size() ==0)){
			System.out.println("登录失败了哦");
			return false;
		}else{
			it = list.iterator();
			while(it.hasNext()){
				ulp = (userloginpo) it.next();
			}
			System.out.println("登录成功");
			System.out.println("用户名是"+ulp.getUsername());
			return true;
		}
	}
}
c,表现层:接下来我们看看表现层的action写法
public class Login extends ActionSupport{
	{
		System.out.println("我在Login");
	}
	private Iuser iuser;
	private String username;
	private String password;


	public Iuser getIuser() {
		return iuser;
	}
	public void setIuser(Iuser iuser) {
		this.iuser = iuser;
	}

	public String getUsername() {
		return username;
	}
	public void setUsername(String username) {
		this.username = username;
	}
	public String getPassword() {
		return password;
	}
	public void setPassword(String password) {
		this.password = password;
	}

	public String execute() throws Exception{
		if(iuser.userlogin(username, password)){
			return "success";
		}else{
			return "input";
		}


	}
上面的代码,我大概解释下,在applicatinContext里面已经配置了此action,并且已经将这个action的属性(一个接口)的实现类已经注入进来了。因此我们在execute方法里才能如此写。
5,自此,我们的配置就完成了,写一个jsp页面进行测试吧:
<body>
<div class="login_center">
	<div class="pleaseLogin">请登录</div>
	<div>
		<!-- theme的值为 xhtml,html,simple,ajax
		没有simple这个属性,标签会换行
		-->
		<ss:form theme="simple" action="login">
			姓名:<ss:textfield name="username" />
			<br />
			密码:<ss:password name="password" />
			<br />
			<!-- 隐藏域 -->
			<!-- 防止重复提交 -->
			<ss:token />
			<ss:submit value="提交" />
			<ss:reset value="重置" />
		</ss:form>
	</div>
</div>
</body>
再写个登录成功和登录失败的页面哦login_success.jsp login_error.jsp
全部的jar下载 该jar已更新到最新。
本文为仓促中写完的,如果有疑问,感谢您留言反馈
爆款云服务器s6 2核4G 低至0.46/天,具体规则查看活动详情