eclipse整合Gradle,Spring Boot和FreeMarket
今天测试了下使用Gradle发布Spring Boot并且整合FreeMarket
本简单分为两部分
单一部分:Eclipse整合Gradle
1.1,安装Eclipse插件
在最新版的Eclipse里面已经整合了Gradle,但是可能不是最新的
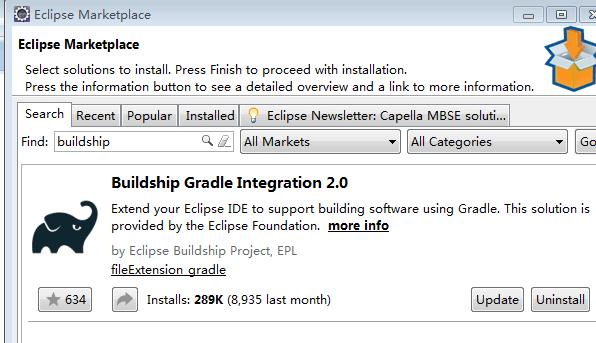
我们可以打开Eclipse Marketplace,搜索buildship

如上图所示,我这里显示可以升级也可以删除,如果您没有安装过,那这里就可以安装了
安装需要等待一会,然后需要重启Eclipse
1.2,下载Gradle
大家可以进入如下连接去下载
http://services.gradle.org/distributions/
1.3,配置eclipse里面的Gradle
打开Preferences,选择Gradle
选择Gradle User Home 即Gradle的安装路径(解压路径)

第二部分:Gradle整合Spring Boot 和 FreeMarket
2.1,创建一个普通的Gradle工程
此时可以向创建Maven项目那样创建Gradle了
即在new - other - Gradle
2.2,添加依赖
创建完Gradle工程后我们就可以看到有build.gradle这个文件
我们在这个文件里添加SpringBoot和FreeMarket依赖
    compile 'org.slf4j:slf4j-api:1.7.21'
    compile 'org.springframework.boot:spring-boot-starter-web:1.4.2.RELEASE'
    compile 'org.springframework.boot:spring-boot-starter-freemarker:1.5.9.RELEASE'
    testCompile 'org.springframework.boot:spring-boot-starter-test:1.4.2.RELEASE'
完整的内容如下(参考):
/*
 * This build file was generated by the Gradle 'init' task.
 *
 * This generated file contains a sample Java Library project to get you started.
 * For more details take a look at the Java Libraries chapter in the Gradle
 * user guide available at https://docs.gradle.org/4.4.1/userguide/java_library_plugin.html
 */

// Apply the java-library plugin to add support for Java Library
apply plugin: 'java-library'

// In this section you declare where to find the dependencies of your project
repositories {
    // Use jcenter for resolving your dependencies.
    // You can declare any Maven/Ivy/file repository here.
    jcenter()
}

dependencies {
    // This dependency is exported to consumers, that is to say found on their compile classpath.
    api 'org.apache.commons:commons-math3:3.6.1'

    // This dependency is used internally, and not exposed to consumers on their own compile classpath.
    implementation 'com.google.guava:guava:23.0'

    // Use JUnit test framework
    testImplementation 'junit:junit:4.12'


    compile 'org.slf4j:slf4j-api:1.7.21'
    compile 'org.springframework.boot:spring-boot-starter-web:1.4.2.RELEASE'
    compile 'org.springframework.boot:spring-boot-starter-freemarker:1.5.9.RELEASE'
    testCompile 'org.springframework.boot:spring-boot-starter-test:1.4.2.RELEASE'
}
2.3,在这个工程上,右键选择Gradle,刷新下即可开始从远程仓库中下载必要的jar包
2.4,创建控制层类
完整的代码如下
package cn.studyBoot;

import org.springframework.boot.SpringApplication;
import org.springframework.boot.autoconfigure.EnableAutoConfiguration;
import org.springframework.stereotype.Controller;
import org.springframework.ui.Model;
import org.springframework.web.bind.annotation.PathVariable;
import org.springframework.web.bind.annotation.RequestMapping;
import org.springframework.web.bind.annotation.ResponseBody;

@Controller
@EnableAutoConfiguration
@RequestMapping("/page")
public class SampleController {
	@RequestMapping("/page/{sss}")
	@ResponseBody
	String home(@PathVariable String sss) {
		return "Hello World!"+sss;
	}

	@RequestMapping("/page1/{aaa}")
	String page1(@PathVariable String aaa,Model model){
		model.addAttribute("iden","你好SpringBoot  =="+ aaa);
		return "index";
	}

	public static void main(String[] args) throws Exception {
		SpringApplication.run(SampleController.class, args);
	}
}
以上代码里定义了两个开放的接口
第一个是 page/page/{sss}
这个接口向页面返回一个字符串
第二个是 page/page1/{aaa}
这个接口跳转到index这个页面,由于我们这里是需要整合FreeMarket
所以这个接口是指向index.ftl这个页面
2.5,配置application.properties
在这个文件里添加如下代码
spring.freemarker.template-loader-path=classpath:/templates
这行代码的意思是,模版文件存在于templates文件夹里
2.6,编写模版文件index.ftl
内容如下:
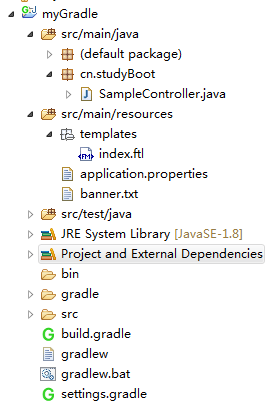
${iden}最终,整个项目的目录结构如下:

最后运行SampleController类,启动项目
打开如下地址即可访问了
http://localhost:8080/page/page1/ddddd
返回结果
你好SpringBoot ==ddddd
自此 Eclipse整合Gradle,Spring Boot,FreeMarKet
爆款云服务器s6 2核4G 低至0.46/天,具体规则查看活动详情