经过一段时间的测试,今天总算整合了 Gradle+SpringBoot+FreeMarket+Activiti5.22,且是动静分离,下面我们就开始我们的整合步骤吧
1,创建一个普通的Gradle项目,并且创建src/mian/resources,需要转换为源文件
2,添加依赖,即build.gradle的内容如下
/*
 * This build file was generated by the Gradle 'init' task.
 *
 * This generated file contains a sample Java Library project to get you started.
 * For more details take a look at the Java Libraries chapter in the Gradle
 * user guide available at https://docs.gradle.org/4.4.1/userguide/java_library_plugin.html
 */

// Apply the java-library plugin to add support for Java Library
apply plugin: 'java-library'

// In this section you declare where to find the dependencies of your project
repositories {
    // Use jcenter for resolving your dependencies.
    // You can declare any Maven/Ivy/file repository here.
    //jcenter()
    //本地maven缓存库
   //mavenLocal()
   //mavenCentral()
   mavenLocal()
   maven {
        url "http://maven.aliyun.com/nexus/content/groups/public/"
    }
   jcenter()
   mavenCentral()
}

dependencies {
    // This dependency is exported to consumers, that is to say found on their compile classpath.
    api 'org.apache.commons:commons-math3:3.6.1'

    // This dependency is used internally, and not exposed to consumers on their own compile classpath.
    implementation 'com.google.guava:guava:23.0'

    // Use JUnit test framework
    testImplementation 'junit:junit:4.12'

    //SpringBoot所需要的jar
    compile 'org.springframework.boot:spring-boot-starter-web:1.5.9.RELEASE'
    compile 'org.springframework.boot:spring-boot-starter-freemarker:1.5.9.RELEASE'
    compile 'org.springframework.boot:spring-boot-starter-data-jpa:1.5.9.RELEASE'
    //整合activiti所需要的jar
    compile 'org.activiti:activiti-spring-boot-starter-basic:5.22.0'

    //mysql
    compile group: 'mysql', name: 'mysql-connector-java', version: '5.1.6'

    //整合activiti所需要的额外包
    compile group: 'org.apache.directory.studio', name: 'org.apache.commons.io', version: '2.4'
    compile group: 'org.activiti', name: 'activiti-json-converter', version: '5.22.0'
    compile group: 'org.apache.xmlgraphics', name: 'batik-transcoder', version: '1.9.1'

    //整个activiti编辑器所需要的部分
    compile('org.activiti:activiti-rest:5.22.0'){
        exclude group:'org.slf4j'
    }
    compile group: 'org.activiti', name: 'activiti-diagram-rest', version: '5.22.0'
     compile group: 'com.alibaba', name: 'fastjson', version: '1.2.45'

    testCompile 'org.springframework.boot:spring-boot-starter-test:1.5.9.RELEASE'
}
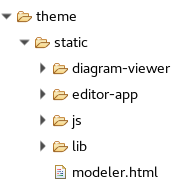
3,创建文件夹theme/static
将5.22源码里的 activiti-webapp-explorer2包下的 diagram-viewer editor-app modeler.html拷贝至这个文件夹下
同时将serlet下面的四个类拷贝至项目
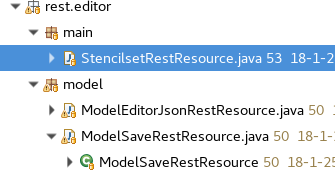
4,将activiti-modeler包里的 editor包拷贝至项目
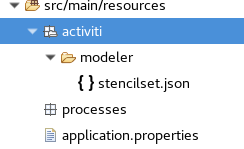
5,在resources下面创建如图所示文件

stencilset.json在activiti的源文件里可以找到
processes为必须创建的,否则启动时会报错
下面我们看看application.properties文件的内容
web.upload-path=/mysoft/eclipse/workspace/SpringBootActiviti/theme/
#设置freemarket的模版路径
#spring.freemarker.template-loader-path=classpath:/templates
spring.freemarker.template-loader-path=file:${web.upload-path}templates
spring.freemarker.allow-request-override=false
spring.freemarker.cache=true
spring.freemarker.check-template-location=true
spring.freemarker.charset=UTF-8
spring.freemarker.content-type=text/html
spring.freemarker.expose-request-attributes=false
spring.freemarker.request-context-attribute=request
spring.freemarker.expose-session-attributes=false
spring.freemarker.expose-spring-macro-helpers=false

#配置静态文件路径
spring.mvc.static-path-pattern=/static/**
spring.resources.static-locations=classpath:/META-INF/resources/,classpath:/resources/,classpath:/static/,classpath:/public/,file:${web.upload-path}static

#配置工作流的数据库
spring.datasource.url=jdbc:mysql://localhost:3306/activiti?characterEncoding=utf8&serverTimezone=Asia/Shanghai&useSSL=false
spring.datasource.username=root
spring.datasource.password=root
spring.datasource.driver-class-name=com.mysql.jdbc.Driver
spring.datasource.maxActive=20
spring.datasource.initialSize=5
spring.datasource.minIdle=5
spring.datasource.maxWait=60000
spring.datasource.maxPoolPreparedStatementPerConnectionSize=20
spring.datasource.timeBetweenEvictionRunsMillis=60000
spring.datasource.minEvictableIdleTimeMillis=300000
spring.datasource.poolPreparedStatements=true

#项目的根  默认就是/
#server.context-path=/activity
server.session.timeout=10
server.tomcat.uri-encoding=UTF-8
#端口
server.port=8011
#activiti整合后,已经程序中处理关闭验证
#security.basic.enabled=false
6,在editor下面的四个类上面加上 @RequestMapping(value = "/service")

7,创建启动类,启动类如下
package cn.studyBoot.modeler.main;

import org.springframework.boot.SpringApplication;
import org.springframework.boot.autoconfigure.EnableAutoConfiguration;
import org.springframework.boot.autoconfigure.SpringBootApplication;
import org.springframework.context.annotation.Bean;
import org.springframework.context.annotation.ComponentScan;
import org.springframework.scheduling.annotation.EnableAsync;
import org.springframework.web.servlet.config.annotation.WebMvcConfigurerAdapter;

import cn.studyBoot.modeler.explorer.JsonpCallbackFilter;

@ComponentScan({"cn.studyBoot","org.activiti.rest.diagram"})
@EnableAsync

@SpringBootApplication
@EnableAutoConfiguration(exclude = {
        org.springframework.boot.autoconfigure.security.SecurityAutoConfiguration.class
})
public class MainActiviti extends WebMvcConfigurerAdapter {

    //整合activiti所需要的filter
    @Bean
    public JsonpCallbackFilter filter(){
        return new JsonpCallbackFilter();
    }

    public static void main(String[] args) throws Exception {
        SpringApplication.run(MainActiviti.class, args);
    }
}
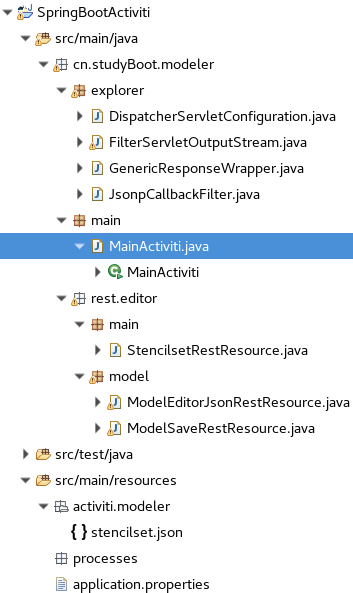
自此,整个项目的目录结构如下所示


打开地址http://localhost:8011/static/modeler.html?modelId=25001就可以看到流程图了,当然如果是空,那肯定是没有这个模型,自行创建一个模型即可
源码包下载学习(第一个github源码项目。初次使用github)
https://github.com/heyouyl/028888.net
爆款云服务器s6 2核4G 低至0.46/天,具体规则查看活动详情